Setting a valid SSL certificates for local development
July 19, 2019

Overview
The web is quickly moving towards HTTPS everywhere. Whether providers like it or not, they have to adopt HTTPS for all their traffic in the near future.
It’s no longer acceptable to use HTTP, even browsers like Google, Mozilla .. have been working for a long time on a user interface that negatively reinforces HTTP and positively reinforces secure HTTPS.
You can read more about “HTTPS Everywhere” here.
It’s recommended to enhance our servers’ security, however, that means that HTTP requests will be rejected by servers configured to accept only HTTPS. This poses a problem for developers who use a local development environment because all of them run on http://localhost.
If you don’t want to run into a situation where your local development environment requests to the server start getting rejected, follow these steps to secure your local environment.
How SSL works
Since HTTPS uses SSL protocol to secure the communication between clients and server, let’s see how SSL works before going deeper into technical details.
SSL fundamentally works with the following concepts:
-
Asymmetric Cryptography uses a key pair for data encryption/decryption named
publicandprivatekeys.Every server has his own key pair and any one who wants to send data(requests) to that server should encryt it with the public key(also known as digital certificate:public key + other information) of that server. Like that only the one who has the private key can decrypt the data . In https, asymmetric cryptography is used to initiate the communication between server and client which is known as SSL handshake. In handshake stage server and client exchange another key which is the secret key of symmetric cryptography. -
Symmetric Cryptography uses only one key for data encryption/decryption. In HTTPS, symmetric encryption is used to encrypt all the communication between server and client and the reason is that asymmetric encryption is more resource intensive. To achieve an SSL communication we need to set an
infrastructurethat includes roles, policies, and procedures needed to create, manage, distribute, use, store, and revoke digital certificates and manage public key encryption.This infrastructure is calledPKI(Public Key Infrastructure).
Step1: Root CA(Certificate Authority)
As a demonstration, I decided to secure a local nginx application and take advantages of a PKI(Public Key Infrastructure) by creating a digital certificate for the application using Openssl tool and enabling ssl in Nginx configuration.
You will find several articles detailing instructions on how HTTPS can be implemented on localhost but browsers will throw an "NET::ERR_CERT_COMMON_NAME_INVALID" error every time you try to access to the application and you need to accept it as an exception .
The reason is that the certificate used by the application is unknown for the browser and it should be signed by a known CA.
You can try the following steps by yourself using our Katacoda scenario .
So first step is to create a Root CA for development purposes instead of buying one from CA providers like Symantec or DigiCert.That CA can be used after that to sign any number of certificates we want.
-
First of all we have to prepare a folder to store all our CA data (we assume that Nginx is installed and we have /etc/nginx folder ) :
$ mkdir /etc/nginx/pki
$ cd /etc/nginx/pki
$ mkdir -p db/ca.db.certs
$ mkdir config
$ mkdir certificats
$ echo ‘01’> db/ca.db.serial
$ cp /dev/null db/ca.db.index
-
After that we need to add
config/ca.configfile that will be used by openssl when signing certificates with our CA :
-
Next step is to create the private key of our CA certificate :
$ openssl genrsa -des3 -out certificats/ca.key 2048
     Command Explanation :
      genrsa        generate private RSA key
     -des3       encrypt the key with DES
     -out <file>   output file of the RSA key
      2048          Bitssize of the key
-
Using this private key we will create a self-signed root certificate :
$ openssl req -new -x509 -days 3000 -key certificats/ca.key -out certificats/ca.crt
     Command Explanation :
      req             create a certificate signing request
     -new            create a new signing request
     -x509           output a self signed certificate instead of a certificate request
     -days <n>       number of days to certify the certificate for
     -key <file>     specifies the private key file
     -out <file>     self signed root ca certificate
-
Now let’s generate the DER file that will be imported in browsers :
$ openssl x509 -in certificats/ca.crt -outform DER -out certificats/ca.der
     Command Explanation :
      req             create a certificate signing request
     -new            create a new signing request
     -x509           output a self signed certificate instead of a certificate request
     -days <n>       number of days to certify the certificate for
     -key <file>     specifies the private key file
     -out <file>     self signed root ca certificate
Step2: Server certificate (singed by the ca)
-
Same thing as the CA we need to create a private key first for our server certificate :
$ openssl genrsa -out certificats/nginx.key 2048
     Command Explanation :
      genrsa        generate private RSA key
     -out <file>   output file of the RSA key
      2048          Bitssize of the key
- To obtain an SSL certificate we need to use OpenSSL to create a certificate signing request (CSR) that can be sent to a Certificate Authority (CA) :
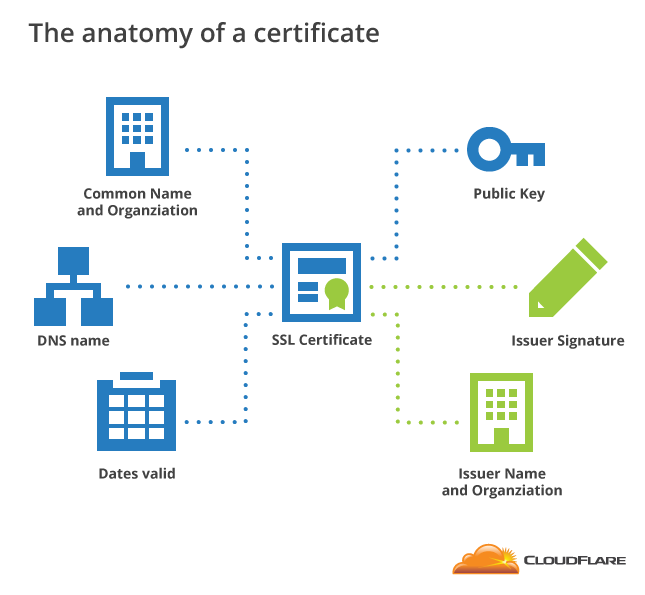
The CSR contains the common name(s) we want our certificate to secure, so we need to make sure when writing the common name which is the domain name that our ca will secure.
In order for a CSR to be created, it needs to have a private key from which the public key is extracted. This can be done by using an existing private key or generating a new one. Because of the security issues associated with using an existing private key, it’s recommended to generate a brand new private key whenever we create a CSR. Because it’s just an example I’m using an existing private key.
> $ openssl req -days 365 -new -key certificats/nginx.key -out certificats/nginx.csr
    Command Explanation :
     req             create a certificate signing request
    -days <n>       number of days to certify the certificate for
    -new            create a new signing request
    -key <file>     specifies the private key file
    -out <file>     output file of CA CSR
-
Finally let’s sign our Nginx certificate with CA that we made :
$ openssl ca -config config/ca.config -out certificats/nginx.crt -infiles certificats/nginx.csr
     Command Explanation :
      ca                    certificate authority management
     -config <file>        use the given openssl config file
     -out <file>           output file (signed certificate)
     -infiles <file>            input file (the CSR)
Step3: Certificate installation
-
Now we should have 3 files in /etc/nginx/certificats which are nginx.crt, nginx.csr and nginx.key (copy them to /etc/nginx/ssl or use them directly from the pki folder):
-
Next step is enabling ssl connexion in Nginx configuration file which is “/etc/nginx/sites-available/default “ , so open the file and uncomment those lines :
      listen 443 ssl default_server;
      listen [::]:443 ssl default_server;
- After that add those lines :
      ssl_certificate /etc/nginx/pki/certificats/nginx.crt;
      ssl_certificate_key /etc/nginx/pki/certificats/nginx.key;
-
To save changes we need to restart Nginx service by this command :
$ service nginx restart
It can fail if the generated certificate and key are not well formed.
After that we have to import der file of our ca into mozilla browser as a trusted authority .
Once it’s imported we can access to our url application with https and Green Lock in our case it is https://localhost where localhost is the common name that I gave for the nginx.crt and nginx.csr.